Text Message Marketing through Schola Campaign is a great way to reach leads and families with shorter, more targeted information about your school throughout the recruitment and enrollment process.
With Schola Text Message Marketing Campaigns, you are able to send out a text “blast” with a One Time Single Bulk Text Message, or an ongoing text campaign with a Recurring Single Bulk Text Message. Either option will allow you to select exactly which leads you’d like to receive your messages, and to customize your format. The main difference will be in the second step of Campaign creation - Scheduling.
Check out the quick tutorial video below for a walkthrough, and continue reading for step-by-step instructions on how to create text message campaigns!
One-Time Single Bulk Text Message
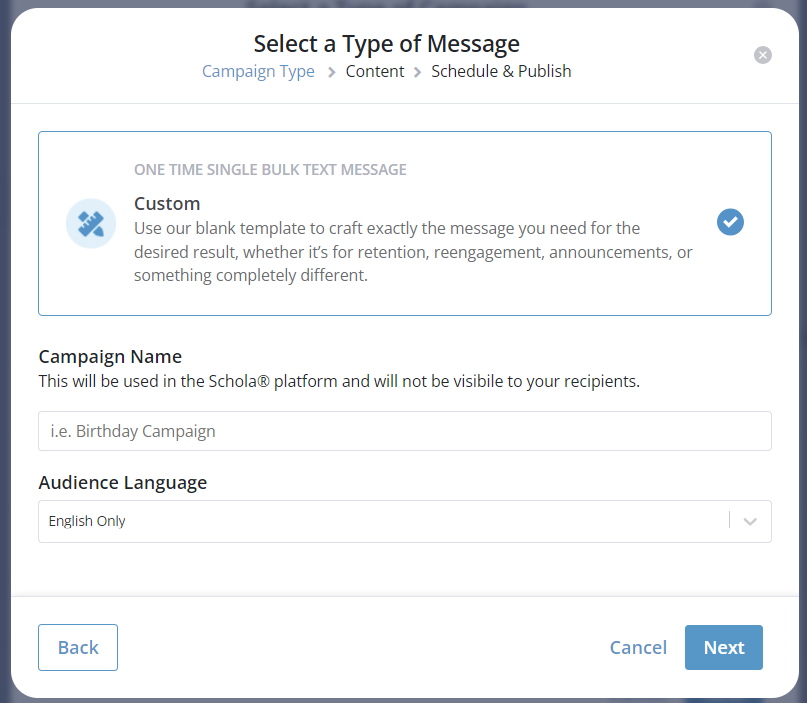
To create a Text Marketing Campaign that will send to a group of leads in your Schola Relationship Manager only once, click Create Campaign and choose Text Message Marketing. Then choose One-Time Single Bulk Text Message in the upper left.

Choose Custom to create your customized text message for your school, then click Next.
Note: You can also choose from several available editable Templates, including Lead to Apply, Lead to Enrollment, Re-Enroll, and Birthday Nurturing.
Now, you’ll want to name your Text Message Marketing Campaign, and choose the language to which it will be sent in Audience Language.
Note: Each lead who comes into the Schola system has the option to choose their primary language for communication - English or Spanish. Campaigns will filter for the language chosen, so if you want to ensure each lead is receiving campaigns in their chosen language, it’s important to make sure each Campaign is set to the appropriate language, and replicated in both English and Spanish manually.
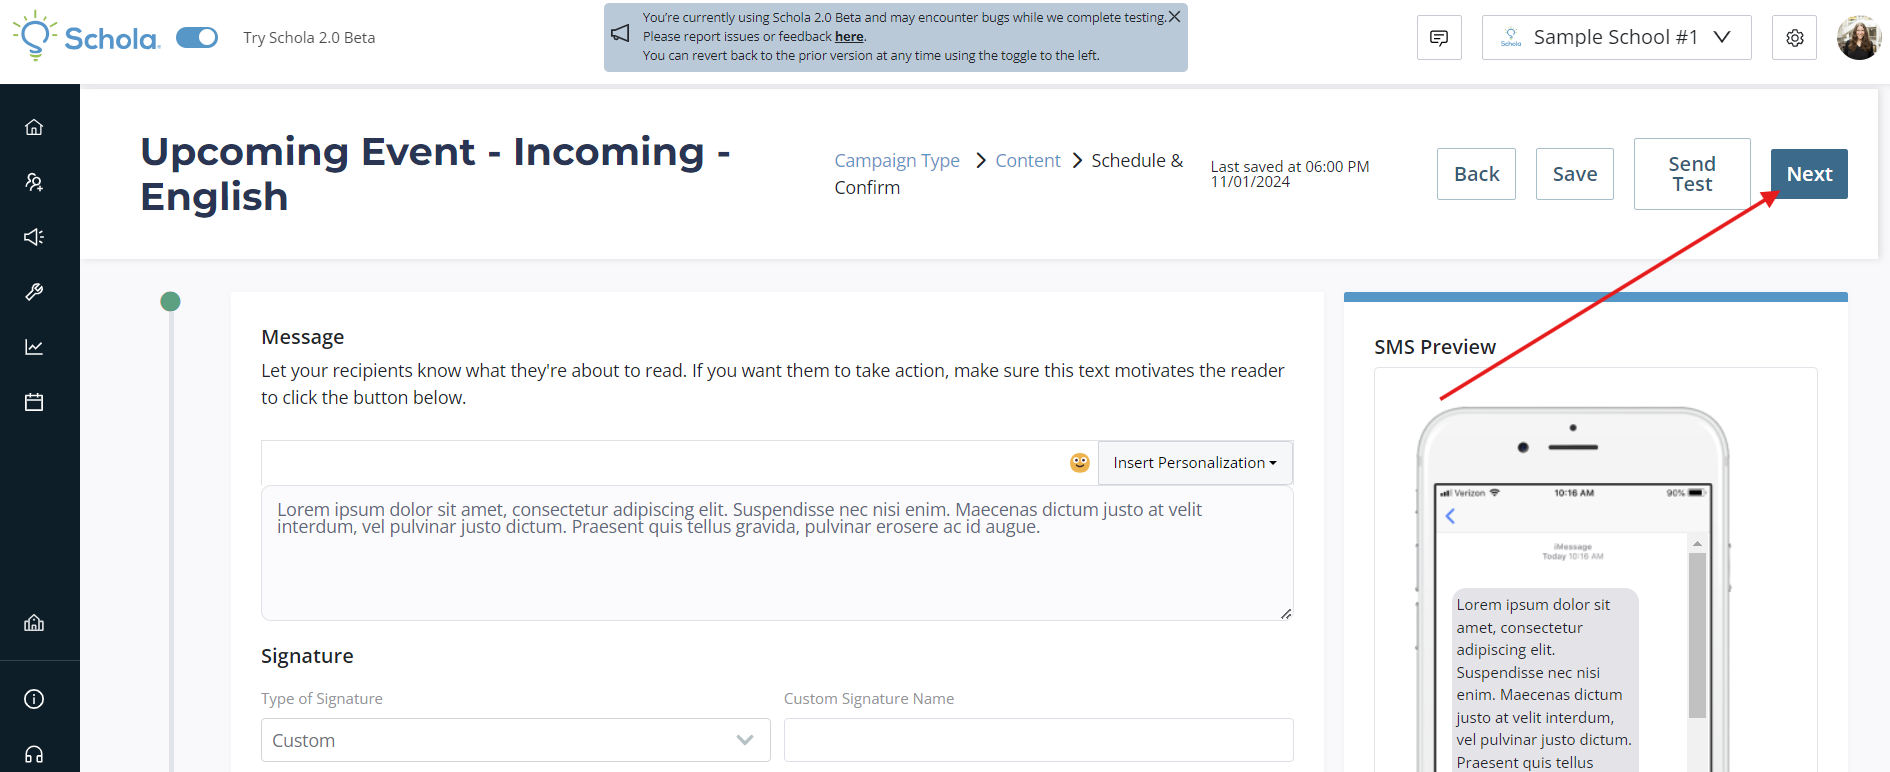
When creating your Campaign Name, we recommend being specific so that each Campaign is easily recognizable in the Campaigns list. For example, if you’re sending a text message to Leads in the Incoming tab about an upcoming event at your school to English speakers, you might title the Campaign “Upcoming Event - Incoming - English.”
Once you name your Campaign and choose the Audience Language, you’ll be taken to the Text Message Marketing Campaign builder, where you can add and edit your original content.
Recurring Single Bulk Text Message
To create a Text Message Marketing Campaign that will send to a group of leads in your Schola Relationship Manager on a recurring basis, click Create Campaign and choose Text Message Marketing. Then choose Recurring Single Bulk Text Message in the lower left.
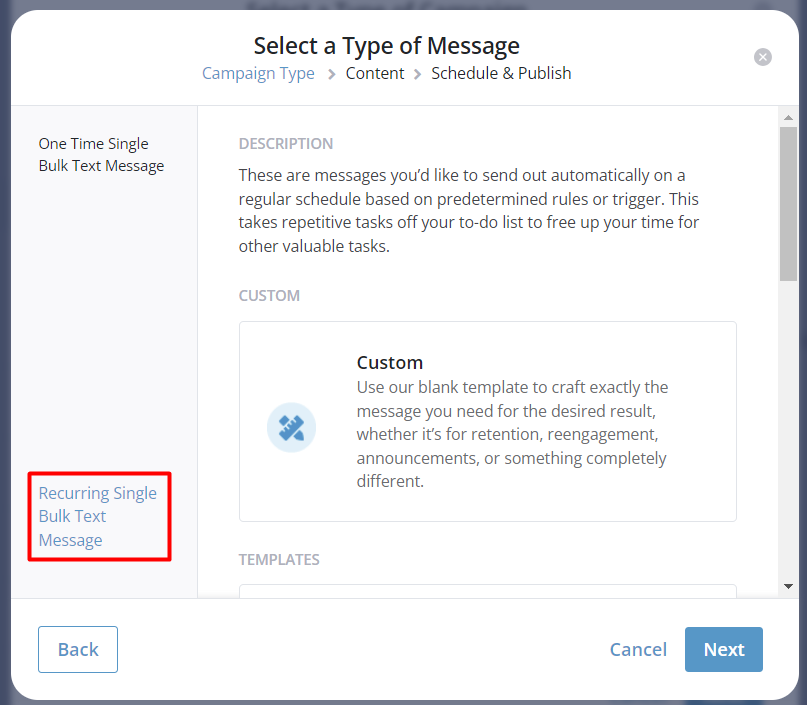
From there, you will follow the same steps as outlined for creating a One Time Single Bulk Text Message.
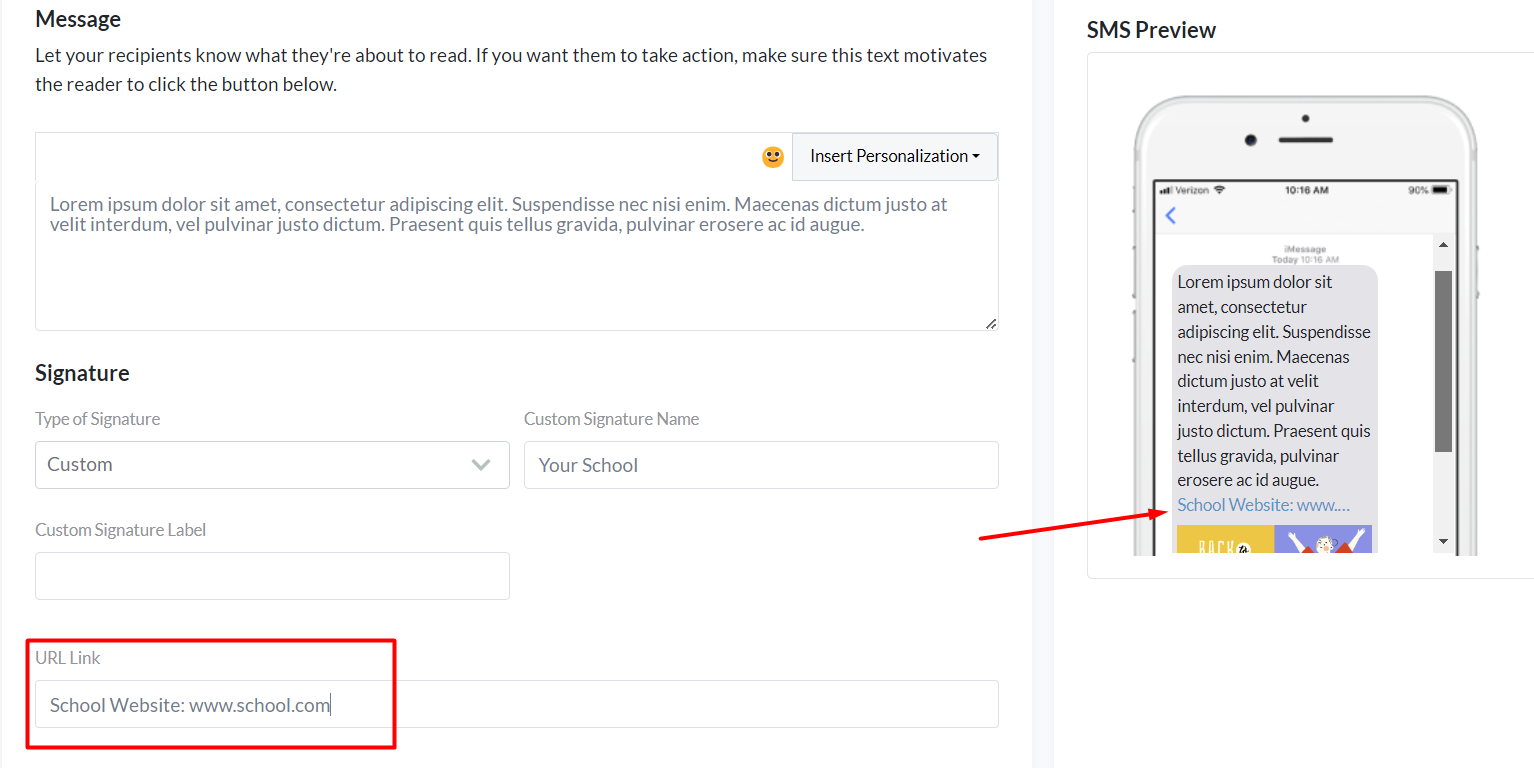
SMS Preview
Before you get started editing, you’ll see there is a live SMS Preview on the right-hand side of the Campaign builder. This will update in real-time as you make changes and additions to your Text Message Marketing Campaign. Use the SMS Preview window to see how your text message will look to recipients!
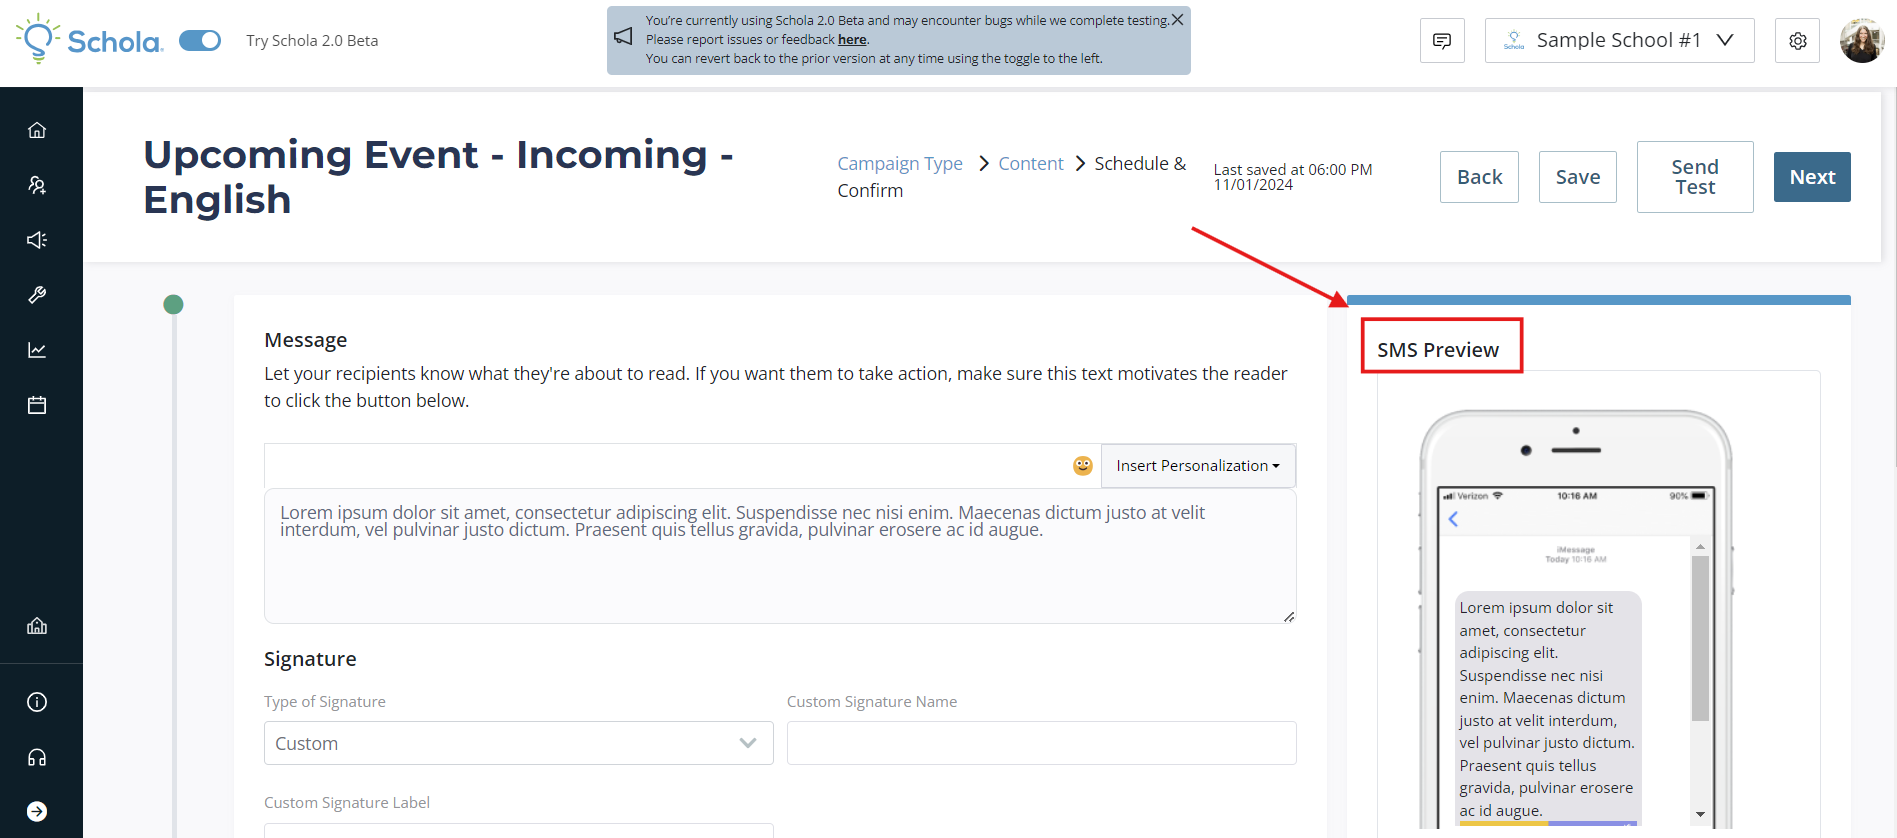
Message
Here is where you can add all the information and detail of your text message.
You have the ability to utilize emojis by clicking on the smile emoji, and this can be a good strategy to grab attention, depending on the brand and personality of your school.

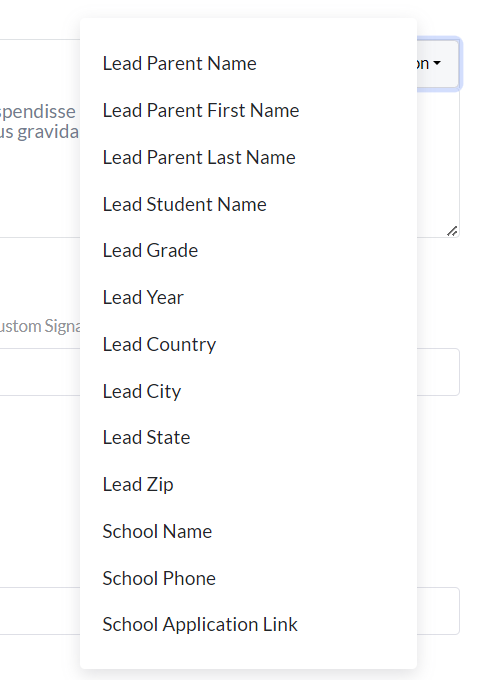
You can also add personalizations to your Message by clicking on Insert Personalization. Here, you’ll see a list of available Personalization, which will pull directly from your School Profile or a Lead’s information in the Relationship Manager.
School Application Link, School Phone, and Lead Student Name can be particularly useful in shorter Text Message Campaigns!
Signature
You have the option to close out your text message with a Signature. When selecting Type of Signature, you will see a drop-down menu of available Signature options, including a Custom option, which allows you to customize the Signature label.
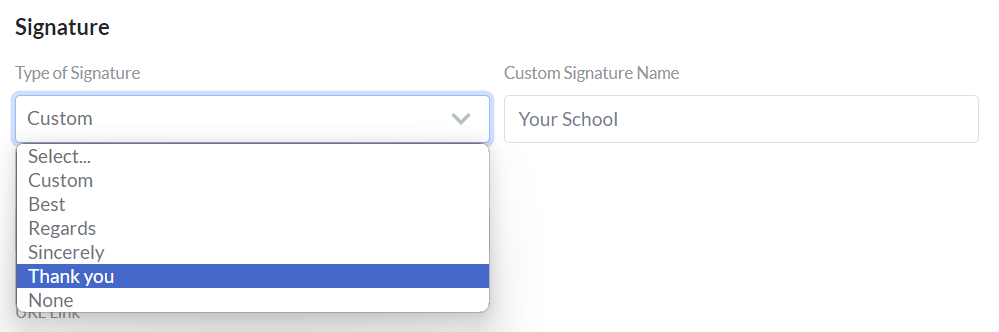
Note: It’s not as necessary to include a Signature in a text message vs. a more formal communication, like an email, but this will depend on the brand and voice of your school.
If you include a Signature, don’t forget to type in your School’s name, or the person you’d like the email to come from in the Customer Signature Name field.
URL Link
You have the option to add a clickable URL link in your text message. This is a great option to have your School’s website, an application, or RSVP form front and center!
In this field, you can add some short text, as well as the URL link you’d like to direct recipients to.
Image
The final piece of your text message content is an image!
To add an image, you’ll click “Remove Image.” This will bring up a field where you can drag-n-drop or click to add and upload your logo or any other image you’d like to include in your text message. Accepted file types are .png, .jpg, and .jpeg. You can also choose specific aspect ratios to make sure you are able to showcase the full image you add.
This can be a great place to include flyers or one-pagers showcasing your school or specific upcoming events.
Once uploaded, you’ll see the image in the preview window on the right-hand side of the Campaign builder!
Test and Confirm
Now that you’ve added all your content, you can send a test message by clicking the Send Test button in the upper right.

This test text message will send to the phone number you enter in the pop-up dialogue box.
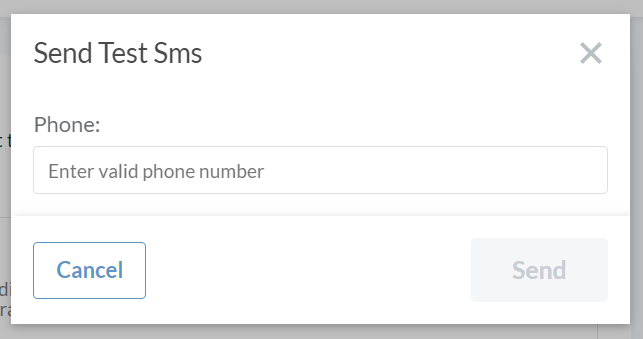
Note: Any personalizations added will show up in a test with the {personalization used} and not your name or information. Rest assured, personalizations will work appropriately when the Campaign goes live.
Next, decide who to send your Text Message Marketing Campaign to and schedule it. Click Next at the top right:
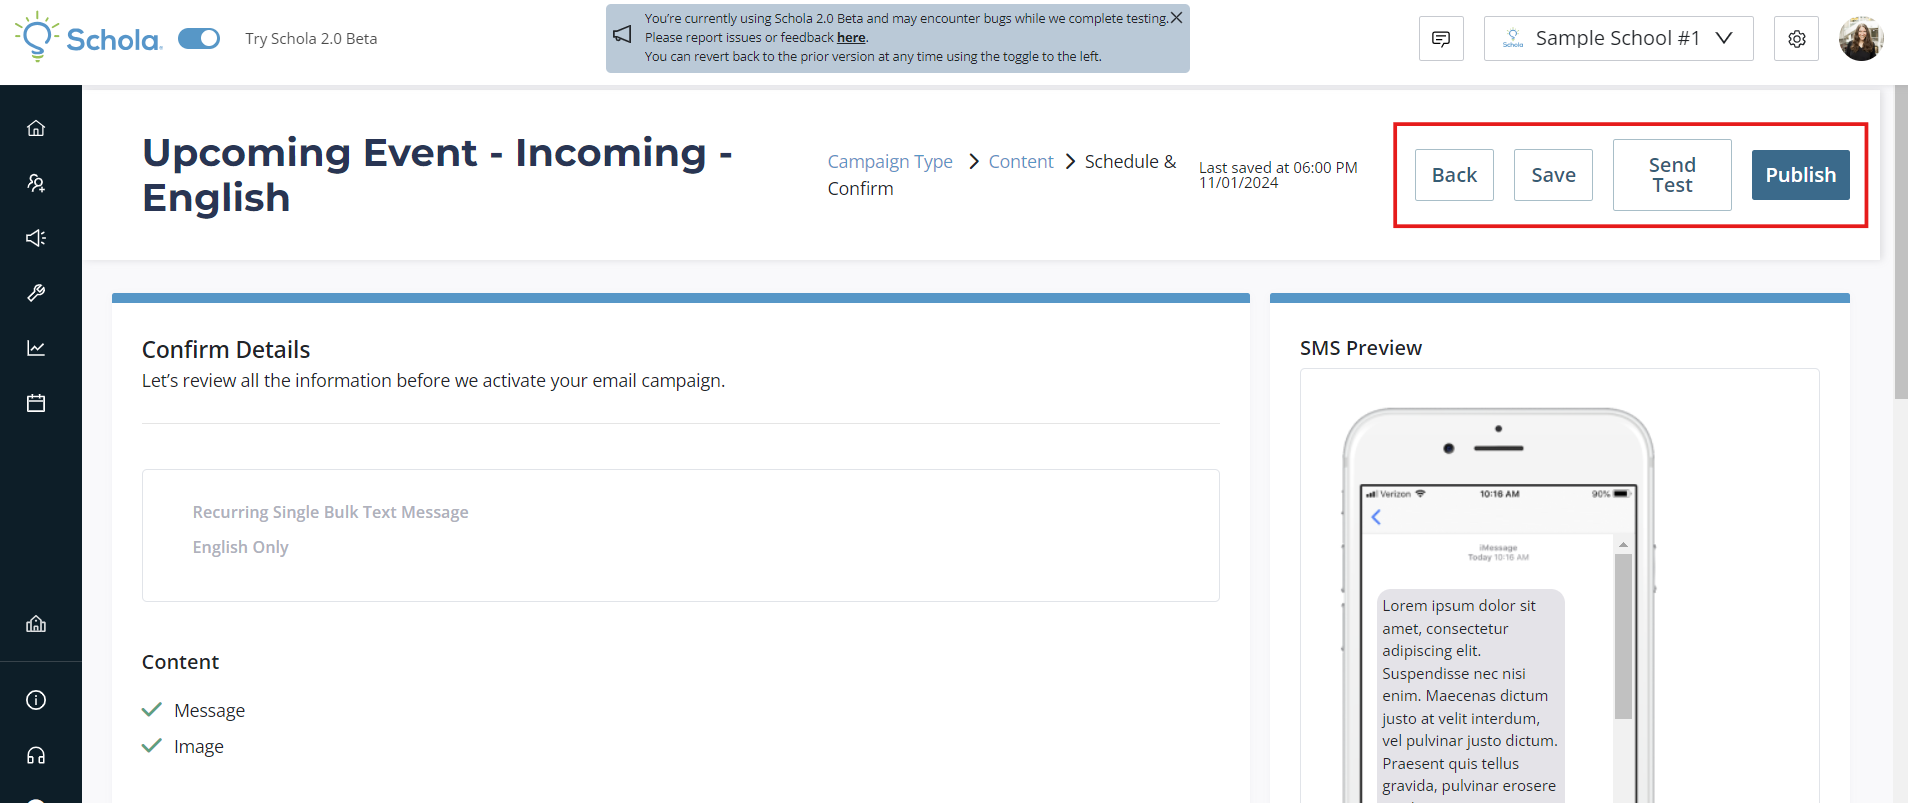
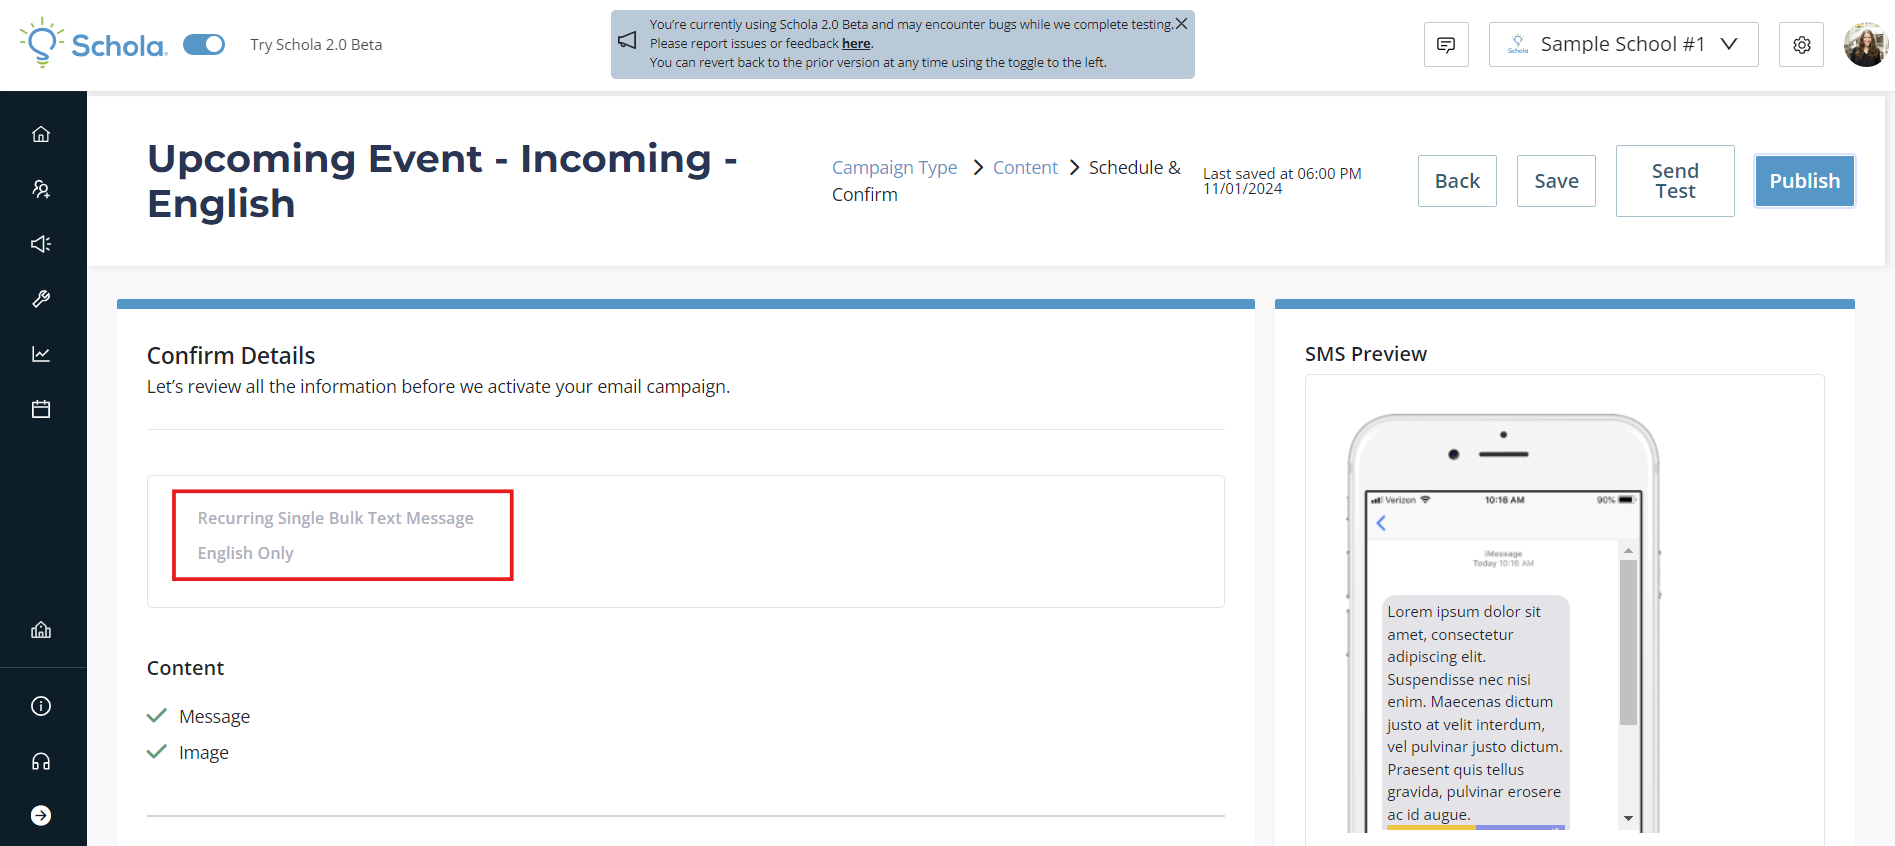
Confirm Details and Content
First, you’ll see a confirmation of what type of text message you’re sending and the audience language. Then you’ll see a checklist of complete or incomplete details for your Content. Make sure to go back and complete anything that’s missing!
Total Audience & Schedule
To choose the Recipients for your email, you will start by selecting which Stage(s) you'd like to send to using the dropdown menu next to Stage.
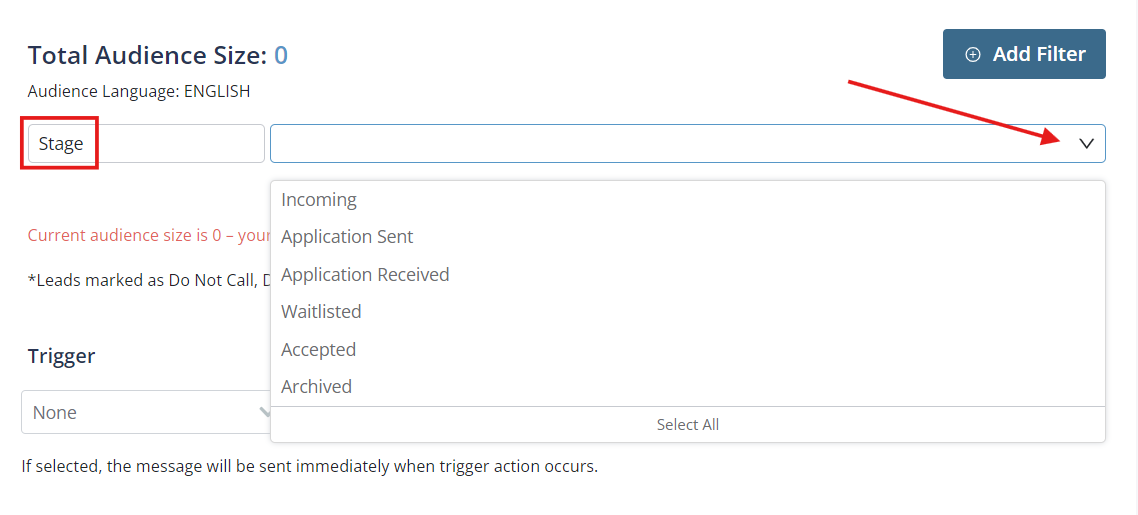
Here, you can select which Stage of Lead you’d like to receive your message, which correlate to tabs in the Schola Relationship Manager. You can choose a single Stage, multiple groups, or Leads in all Stages by clicking Select All. When you select the desired Stage, messages will be sent to all Leads within that tab who have selected the corresponding Audience Language.
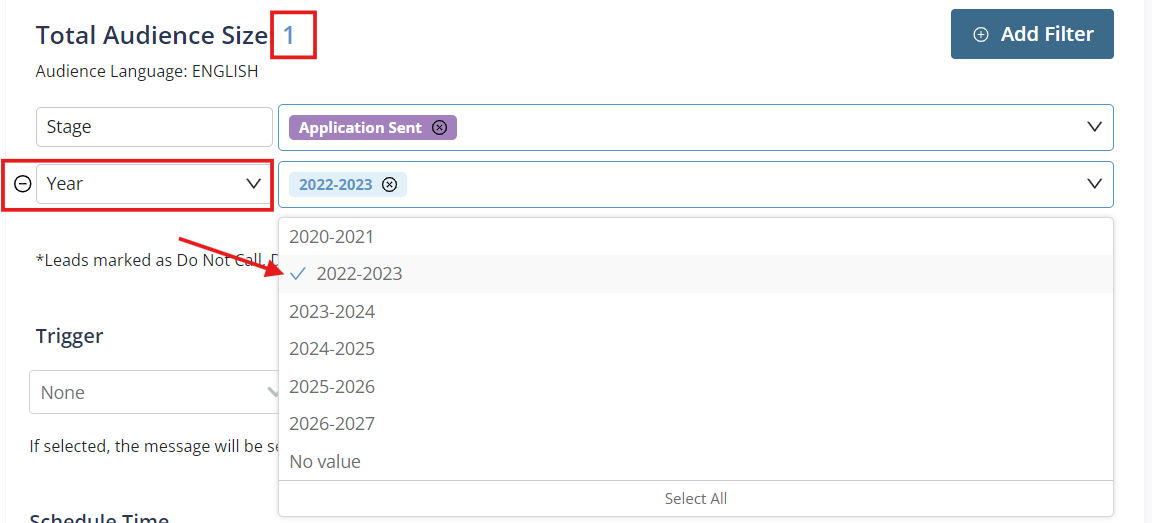
Once selected, you will see the Total Audience Size amount populate.
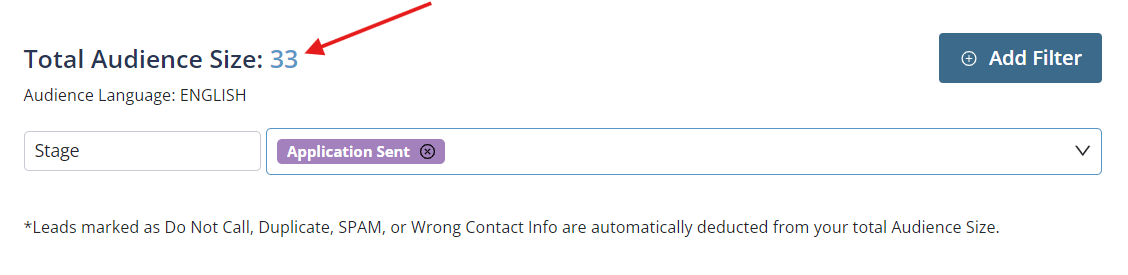
Note: Leads marked as Do Not Call, Duplicate, SPAM, or Wrong Contact Info are automatically deducted from your total Audience Size.
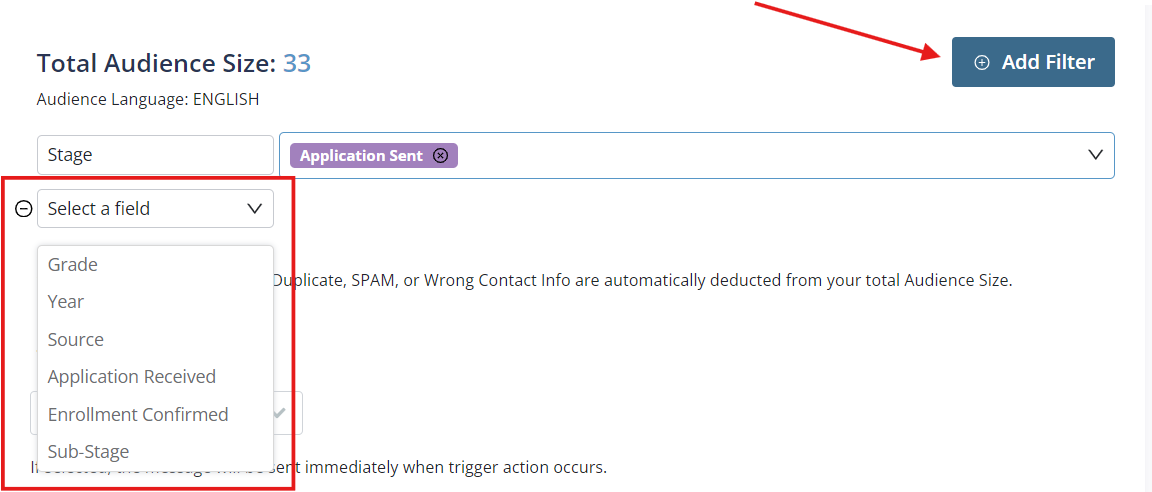
If you want to send your email to only a certain segment of Leads within a tab or Stage, you can do this by clicking Add Filter. You'll then be presented with a list of options you can choose to further segment specific recipients for your message. Filter options include:
- Grade
- Year
- Source
- Application Received
- Enrollment Confirmed
- Sub-Stage
Once you choose a Filter category, that will present additional options to segment that category. The Total Audience Size will re-populate based on your choices.
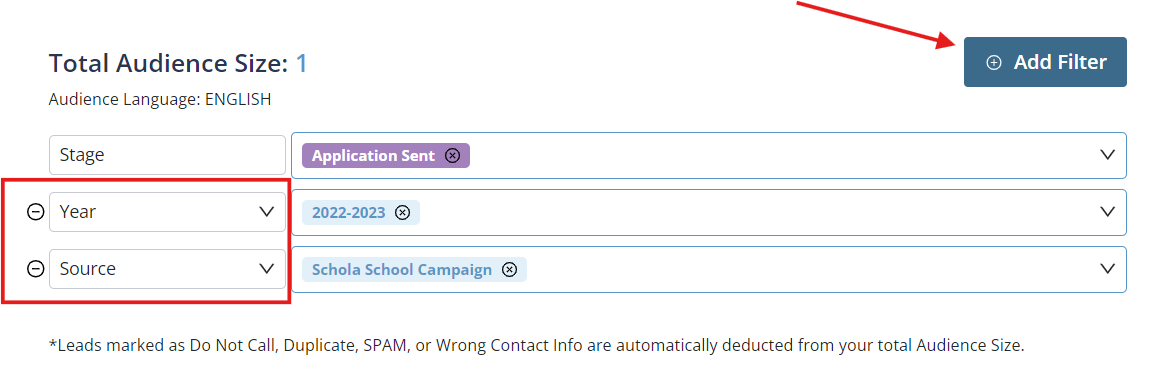
You can add multiple Filters by selecting Add Filter and repeating the process.
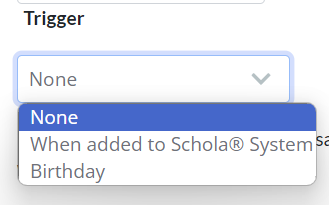
You also have the option to send your text message based on a Trigger - an action that will send a Campaign message immediately upon that action’s occurrence. Clicking the drop-down menu under “Trigger” will give you the available options, including when a lead is added to the Schola system, and on a lead’s birthday.
This can be a useful option for a first-contact message, and a great way to send something personalized on a special day!
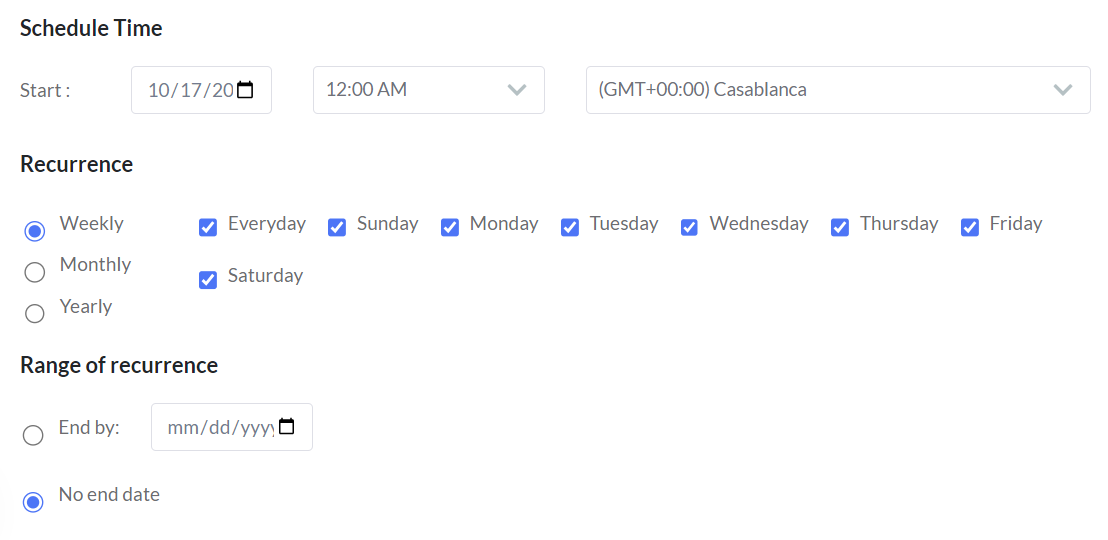
Schedule Time
For a One-Time Single Bulk Text, you will see the option to schedule the start date, time, and time zone when you want to send your message.
For a Recurring Single Bulk Text, you will see the same fields, as well as additional options to set the desired recurrence.
Recurrence
You can choose to have a Recurring Single Bulk Text sent on a weekly, monthly, or yearly basis.
For a weekly recurring schedule, the default setting will be Everyday. However, you can deselect this box and choose which specific days you want the message to be sent.
Note: Since a recurring message might go out to a lead repetitively, you will want to be thoughtful about how often you want them to receive the same email message. We typically recommend once or twice a week.
Range of recurrence
You can choose to have a message sent continuously with no end date, which is the default option.
If you only want your message to be sent through a certain date, you’ll want to select End by: and enter that date. At that time, the Campaign will no longer send to recipients and will automatically be marked with a Finished status in the Campaigns list.
Publishing your campaign
You’ve finished creating your Campaign!
If you need to go back and make changes, you’ll want to use the Back button on the top right of your screen.
You can also Save your campaign to publish later, and it will show in your Campaigns list as Draft in the status column.
Or you can click Publish and your Campaign will be live! It will show in your Campaigns list as Active.